Thursday, December 22, 2011

How to generate package download script using synaptic?

This post describes how to install linux (.deb)packages into a linux machine which have no/low speed internet connection[In linux one should have a good internet connection to get connected to repository to install any new packages].  Ofcourse this will be achieved only through a another linux machine(of same distro&same version unless you know how to modify /etc/apt/sources.list and update the linux machine) that has good internet connection like your Relative's/friend's machine or a linux box in browsing center etc.  I am explaining the following thing with BOSS GNU/Linux 4.0(savir version name).

We can achieve the installation of a package into a machine with low/no internet connection
Method 1:
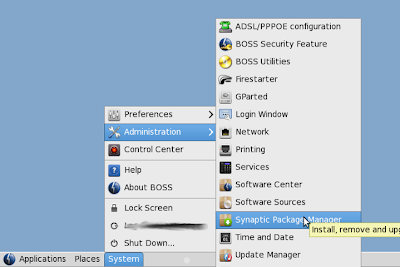
1. The machine in which you want to install  go  System -> Adminstration -> Synaptic Package Manager


2. Select the package which you want to install.  
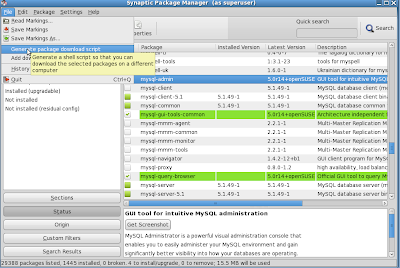
 Note: Synaptic itself selects all the other dependency packages that are needed to install the package you selected.  You can see a green color tick mark, those packages are going to be installed
3. Now click on File -> Generate Download script, give a file name for the script and select path to save it.
4. Keep the resultant file with you & execute that shell script file in a machine which have the internet connection, it will downloads all the packages(.deb files) that are needed to install the packages you selected.  
5. Copy all those files to your linux machine and install through terminal as follows
$cd /path_to/deb_files/directory
$sudo dpkg -i *.deb
6. Now the packages is installed successfully thats all.

Method 2:
Another way, is install the package which have a good internet connection and copy the .deb files downloaded for that installation, use it in your system
1. First clean the archives directory
$sudo apt-get clean
2. Install the package which you want using
$sudo apt-get install <package_name>
3. copy all the .deb files from the /var/cache/apt/archives directory to your removable media(pendrive)
$mkdir /media/<your_perndrive_moutn_point>/deb_directory
$sudo cp /var/cache/apt/archives/*.deb /media/<your_perndrive_moutn_point>/deb_directory
4. Insert the pendrive in your machine and do the following
$cd /media/your_pendrive_mount_point/deb_directory
$sudo dpkg -i *.deb

Thats all the packages are installed in your machine...  This two methods are useful when you try to install huge packages like office, gimp, blender etc...

any how Methode 1 is best one as it creates the script to download the .deb packages that actually is needed to install into your machine, and it doesn't install only downloads.  
Monday, December 19, 2011

How to create a simple local apt repository?

This post is regarding debian based distros which supports .deb, so the procedures are not applicable for distros that uses .rpm like fedora, redhat etc..
Requirements:
build-essential
dpkg-scanpackages
gzip

How to do:
1. Create a directory named "repo" in your home directory.  say $mkdir /home/test/repo
2. Copy all the debs you have into the /home/test/repo
3. Open your terminal as root and do the following & change directory to /home/test/repo
    #mkdir /home/test/repo
     #cd /home/test/repo
     #dpkg-scanpackages . /dev/null | gzip -9c > ./Packages.gz

Here, '.' specifies -> present working directory
/dev/null specifies -> override file, as we not going to use override file we give /dev/null
gzip -9c>./Packages.gz -> Compresses the package details into the file Packages.gz
(Packages.gz will be created within the present working directory)
4. add the following line in your /etc/apt/sources.list file
deb file:/home/test/repo/ /
5. Update your system using apt-get update command
#apt-get update
6. Thats all now your /var/lib/apt/lists will be updated
Note: Remember now whenever you use "apt-cache search" "apt-get install" it only installs from debs inside /home/test/repo.

Thursday, December 1, 2011

Are you facing the font rendering problem in your tamil-blog..?


My tamil blog fonts are not rendering correctly in browser...
Here is the correct solution..
What to do:
1. Do remove Freesans, Freeseriff, sans-seriff fonts from your blog's template.

How to do:
1. Open your tamil-blog in browser and sign-in [in top-right corner]
2. In Design view click on template --> Edit Html --> Proceed


3. Copy the full html content into your text editor (notepad/gedit)
4.  Then find & remove the Freesans, Freeserif, sans-seriff fonts from all styles(css)
5. Save the template(Modification)
Note: You can see the preview of your changes, and accordingly customize/fine-tune your template.
6. Once you are satisfied save the template.. thats all.

Conclusion:
For make your blog/website to be better rendered with tamil fonts in all machines & browsers
1. It is advised don't use Freesans, Freeserif fonts in your blog/website.  We are not sure all the machines have the font Freesans, Freeserif.
If you want to see other's blog/website which is not rendered properly with tamil fonts
2. You need to remove Freesans, Freeserif fonts from your machine(linux).  For that read this my another post regarding font rendering issue